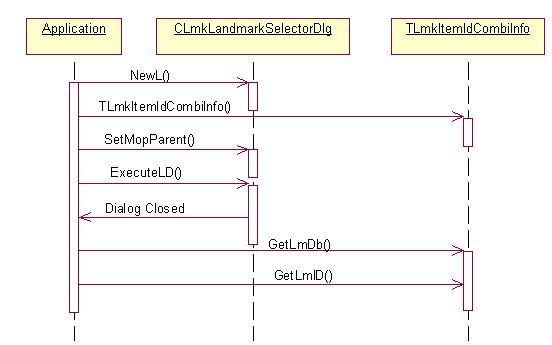
Figure 6: Launching a single landmark selector dialog
The client can use this API to launch a dialog that allows the end-user
to select one landmark from a list of landmarks. The single landmark selector
dialog is launched by creating an instance of CLmkLandmarkSelectorDlg class
using the NewL() method and then calling the ExecuteLD() method.
A reference to a single instance of the TLmkItemIdDbCombiInfo class
is passed while calling ExecuteLD() that will contain the
selected landmark's information.
Once the user selects a landmark and confirms (by pressing "ok" ) the dialog
is closed and the selected landmark's Id and database handle can be retrieved
by the client application using GetItemId() and GetLmDb() methods
of the TLmkItemIdDbCombiInfo class respectively.
The client can set its view or AppUI as the parent object of the landmark
\ category selector dialog, thereby creating a network of object providers
using the SetMopParent() method.
Following diagram illustrates steps involved in launching a single landmark selector dialog and retrieving the selected landmark's Id and database handle after user's selection.

Figure 6: Launching a single landmark selector dialog
The following code snippet shows launching of single landmark selector dialog.
void CMyLmUiAppView::LaunchLandmarksSingleSelectorL()
	{
//It will hold the landmars id,after a selection is made
//using single landmark selector.
TPosLmItemId  selectedItem;
CPosLandmarkDatabase* db = NULL;
//Launch LMK Selector
CLmkLandmarkSelectorDlg* lmkSelectDlg = CLmkLandmarkSelectorDlg::NewL();
lmkSelectDlg->SetMopParent(this);
TLmkItemIdDbCombiInfo selItem;
TInt retVal = lmkSelectDlg->ExecuteLD( selItem );
if (retVal !=0)
        {
        //Extract the selected landmarks id
        selectedItem = selItem.GetItemId();
        //extract the database handle returned.
        //this data base handle can be used for viewing the
        //landmark using Add/Edit API's.
        db = selItem.GetLmDb();
        }
} The client can do this by creating an object of CLmkLandmarkSelectorDlg class
and then launching the dialog using the ExecuteLD() method.
On return from ExecuteLD(), a reference to the array of TLmkItemIdDbCombiInfo will
hold the selected landmark Ids.
While launching the dialog , the client can also set some landmarks to
be shown as already pre-selected and this is done by adding the landmark Ids
of such landmarks to the same array of TLmkItemIdDbCombiInfo before
calling ExecuteLD().
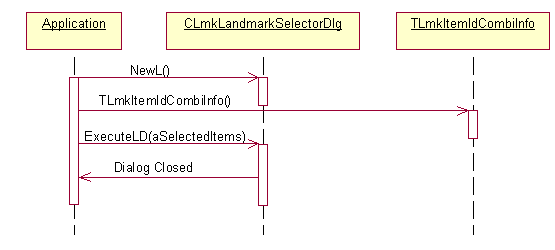
The following diagram illustrates steps involved in launching a multiple landmark selector dialog.

Figure 7: Launching a multiple landmark selector dialog
The landmarks that are sent while launching the dialog are shown as pre-selected.
Following code snippet shows launching of multiple landmark selector dialog.
void CMyLmUiAppView::LaunchLandmarksMultipleSelectorL()
  {
  //using multiple landmark selector.
  // Launch LMK Selector
  CLmkLandmarkSelectorDlg* lmkSelectDlg = CLmkLandmarkSelectorDlg::NewL();
  lmkSelectDlg->SetMopParent(this);
  RArray<TLmkItemIdCombiInfo> selItemArray;
  TInt retVal = lmkSelectDlg->ExecuteLD( selItemArray );
}The client can use this API to launch a dialog that allows the end-user
to select one category from a list of categories. The single category selector
dialog is launched by creating an instance of the CLmkCategorySelectorDlg class
using the NewL() method and then calling the ExecuteLD() method.
Rest of the usage of Single category selector is same as the single landmark selector described above.
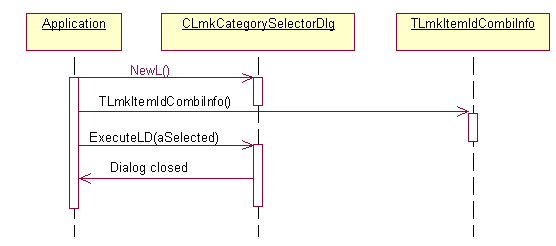
The following diagram illustrates steps involved in launching a single category selector dialog.

Figure 8: Launching single category selector dialog.
void CMyLmUiAppView::LaunchSingleCategoryDlgL()
    {
    //Using single category selector
    //Launch single category selector
    CLmkCategorySelectorDlg* categorySelectDlg = CLmkCategorySelectorDlg::NewL();
    categorySelectDlg->SetMopParent(this);
    TInt retVal=categorySelectDlg->ExecuteLD( selItem );
}The client can launch a multiple category selector dialog by creating an
object of CLmkCategorySelectorDlg class and then launching
the dialog using ExecuteLD() method. On return from ExecuteLD(),
a reference to the array of TLmkItemIdDbCombiInfo will hold
the selected category Ids.
While launching the dialog , client can also set some categories to be
shown as already pre-selected and this is done by adding the category Ids
of such categories to the same array of TLmkItemIdDbCombiInfo before
calling ExecuteLD()..
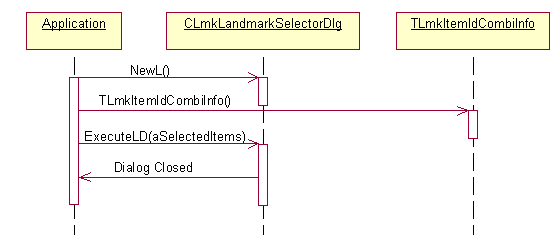
Following diagram illustrates steps involved in launching a multiple category selector dialog.

Figure 9: Launching multiple category selector dialog
The categories that are sent while launching the dialog are shown as pre-selected.
void CMyLmUiAppView::LaunchMultiCategorySelectorDlgL()
  {
  // Launch multiple Category Selector
  CLmkCategorySelectorDlg* categorySelectDlg = CLmkCategorySelectorDlg::NewL();
  categorySelectDlg->SetMopParent(this);
  //This array can hold, even the pre-filled category id's.
  //If the dialog is launched with the pre-filled id's,corresponding
	//categories will be shown as pre-selected.
  //After the dialog is launched,category id's for the selected categories
  //along with the pre-selected id's, will be returned in the array.
  RArray <TLmkItemIdCombiInfo> selItemArray;
  TInt retVal = categorySelectDlg->ExecuteLD( selItemArray );
}Landmark UI Selector API uses the standard Symbian error reporting mechanism. The errors are reported through leaves
The memory consumption depends upon the number of landmarks \ categories present in the database.
There are no extensions defined to Landmarks UI Selector API.