![]()
![]()
![]()
Figure 80
shows how the example looks at run time. The labels shows what happens to colors when opacity values are used. The opacity value determines how the source color is mapped to the destination color when pixels are drawn over each other. In Figure 80, a white frame is drawn over a red background at 0 opacity in the top polygon; and a white frame is drawn over a red background at 0.5 opacity in the bottom polygon. At 0.5 opacity value, the white frame blends with the red background and makes a shade of gray that looks purple. The bottom polygon also blends a green and blue fill at 0.5 opacity with the red background to make a dark purple shade for the polygon fill.
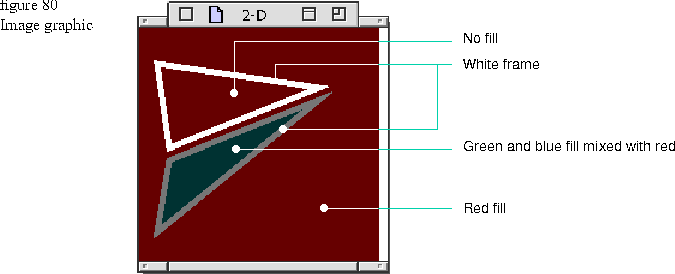
The following code creates three bundles, two polygons, and an image. The image is the red-filled rectangular portion shown inFigure 80. The polygons and their bundles are drawn into the image port. When the image is drawn, its contents are sent to the view.
Lines 29 through 36: Create and draw the image graphic. A TA8R8G8B8Image is instantiated with a destination origin of TGPoint( 0, 0 ), a width of 200 pixels in the x direction, and a width (depth) of 200 pixels in the y direction. Once the image is instantiated, use the GetGrafPort function to retrieve the image port. Once you have the image port, you call its draw function to fill it. An image is filled by creating a rectangle geometry that is the same size as the image and passing in the red fill bundle to fill the rectangle. If you do not fill the image, it appears black. The 0.5 opacity value mixes the red color specified in the bundle with the default black of the image.
You call the draw function for the polygons and pass them the image port so that the polygons are drawn into the image over the red fill. Lastly, to see the image graphic in the view, call the Draw function of the image.
If you replace the Draw function with the DrawPartial function and give it the parameter values shown in the code fragment below, it will draw the image shown in Figure 81 Include files and code
You need to add the GraphicImage.h include file to use image graphics. You may also need to add AlbertPixelBuffers to your PinkMake libraries.
Lines 1 through 15: The attribute bundles are created first as follows:1 TGrafBundle* whiteFrameBundle = new TGrafBundle(TFrameBundle(
2 TRGBColor( GIntensity(1),
3 GIntensity(1),
4 GIntensity(1), 5.0 ) ) );
5
6 TGrafBundle* fillAndFrameBundle = new TGrafBundle( TFillAndFrameBundle(
7 TRGBColor( GIntensity(0),
8 GIntensity(.5),
9 GIntensity(.5),
10 GIntensity(.5) ), 5.0 ) ) );
11
12 TFillBundle redFillBundle( TRGBColor( GIntensity(.75),
13 GIntensity(.25),
14 GIntensity(.25),
15 GIntensity(.5) ) );
16
17 TGPolygon aPolygonGeometry;
18 aPolygonGeometry.Append( TGPoint( 15, 30 ) );
19 aPolygonGeometry.Append( TGPoint( 25, 100 ) );
20 aPolygonGeometry.Append( TGPoint( 150, 50 ) );
21 TPolygon* aPolygon = new TPolygon( aPolygonGeometry, whiteFrameBundle );
22
23 TGPolygon aPolygonGeometry2;
24 aPolygonGeometry2.Append( TGPoint( 15, 170 ) );
25 aPolygonGeometry2.Append( TGPoint( 25, 110 ) );
26 aPolygonGeometry2.Append( TGPoint( 150, 60 ) );
27 TPolygon* aPolygon2 = new TPolygon( aPolygonGeometry2, fillAndFrameBundle );
28
29 TA8R8G8B8Image anRGBImage( TGPoint( 0,0), 200, 200 );
30 TGrafPort* imagePort = anRGBImage.GetGrafPort();
31
32 imagePort->Draw( TGRect( 0, 0, 200, 200 ), redFillBundle );
33
34 aPolygon->Draw( *imagePort );
35 aPolygon2->Draw
36 anRGBImage.Draw( thePort );
Lines 17 through 27: The top polygon is instantiated as aPolygonGeometry, and the bottom polygon is instantiated as aPolygonGeometry2 by appending points. Draw part of the image
In addition to the MDrawable::Draw function, you can use the TImage::DrawPartial function to render the portion of the image enclosed by the areaOfInterest parameter. Figure 81 shows the portion of the image that is drawn by the code fragment that follows.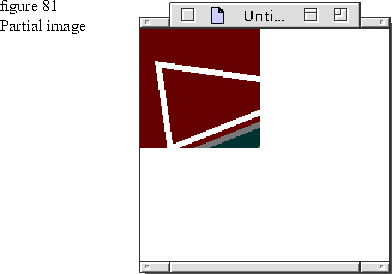
anRGBImage.DrawPartial( thePort, TGRect( 0, 0, 100, 100 ) );
Hit detection as described in Chapter 3 works on the image as a unit. You cannot perform hit detection on the individual graphics once they have been drawn into the image.
Image classes
The color and opacity information (alpha channel) in the attribute bundle is mapped to the appropriate pixels to create interesting visual effects. The exact mapping algorithm varies with each image class as summarized in the following table. There is also likely to be some difference in appearance according to which color class you use. The example above uses the red, green, and blue (RGB) color space. See Chapter 7 for other color spaces to use with graphics.
| Derived Class | Description | |
|
TModifiableImage derived classes |
TA1R5G5B5Image | 1bit opacity, 5 bits red, green, blue for transparent RGB images |
| TA8R8G8B8Image | 8bit opacity, 8 bits red, green, blue for transparent RGB images | |
| TAlpha8Gray8Image | 8bit opacity, 8 bits gray scale for transparent gray images | |
| Tb1R5G5B5Image | 1-bit blank (pad), 5 bits red, green, blue for transparent RGB images. | |
| Tb8R8G8B8Image | 8bit blank (pad), 8 bits red, green, blue image for continuous tone RGB images | |
| TC8M8Y8K8Image | 8-bits cyan, magenta, yellow, and black for color printers | |
| TR8G8B8Image | 8bit of red, green, blue for continuous tone RGB images | |
| TGrayImage | 4bit or 8bit gray image set by the value in EGrayImageType for antialiased fonts or continuous tone monochrome images | |
| THalftoneImage | 1bit halftone image for halftoned bilevel output | |
| TIndexedImage | 8bit index into a color lookup table for table animation or pseudocolor |
Use the example code above but change the class type in the image instantiation to another one in this table. See the heading "Constructors" on page 127 for information on their constructors. You can change the opacity values in the different bundles used in the examples to see how the resulting image appearance changes with different image types and different opacity values.
Image classes without an "A" in their name (for example, TGrayImage) do not have an alpha channel. The alpha channel applies the opacity information to the image colors. When there is no alpha channel, even if you have specified opacity values for the colors, that value is not used. The hue, saturation, and light (HSL) and hue, saturation, and value (HSV) transfer modes with "Blend" in their names described in Chapter 7 let you achieve opacity blending when there is no alpha channel in the class. See Chapter 7 for information on how opacity values combine with transfer modes to create different visual effects.