![]()
![]()
![]()
The graphic and geometry classes have a number of constructors from which you can choose. These examples construct graphics directly from the computational geometry and point array classes described under the heading "Underlying geometry classes" on page 239 to help you understand the design of the geometry classes.
In the line example, the drawing is done by calling the TGrafPort::Draw function. In the other examples an MGraphic3D derived class is used to create the shape and the MGraphic3D::Draw function is called instead. Using the geometry class directly and passing it to the TGrafPort::Draw function is a fast way to draw that uses very little overhead. You would take this approach when you don't need the functionality provided by MGraphic3D. TGrafPort::Draw accepts an optional transformation matrix and attribute bundle.
You would use an MGraphic3D derived class to arrange graphics into a 3-D group, or to use the MGraphic3D transformation functions to transform the MGraphic3D derived class without using a matrix. See Chapter 19 for information on drawing ports, and see the heading "3-D transformation matrix" on page 241 for information on the 3-D transformation matrix.
Draw a 3-D line
This DrawContents implementation draws a line in 3-D space using the default bundle and the default origin. The default bundle provides a black hairline frame and no fill. The default origin is the center of the view, which varies according to whether or not you use the default view size or change it as described in Chapter 2. These examples use a view that is 1000 world-coordinate units wide and high. The default is 250 world-coordinate units wide and high.
Figure 135 shows how the line looks at run time. The points are projected onto the 2-D plane according to your camera settings. In this case because no camera is specified, the default perspective camera and settings are used. A perspective camera works exactly the same way as a real-world camera. See Chapter 17 for more information on cameras.

1      TFrameBundle3D frameBundle( TRGBColor( 0, 0, 0 ), 5.) );
2      TLine3D lineGraphic( TGLine3D( TGPoint3D( 10, -10, 15 ),
3                          TGPoint3D( 125, -40, 25 ) );
4
5      lineGraphic.AdoptBundle( new TGrafBundle( frameBundle );
6      lineGraphic.Draw( thePort);
Lines 5 and 6: Adopt the bundle to the line graphic and draw the line.
Transform the line
You can transform the line by creating a transformation matrix and passing it to the drawing port with the line, or by creating a TLine3D and calling one of the MGraphic3D transformation functions. Figure 136 shows the line before and after it is translated by TGPoint(10, 15, 20). The DrawContents implementations below show two ways that you can preform this translation.
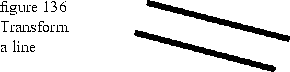
This DrawContents implementation creates a transformation matrix (translateMatrix) to translate the line 10 world-coordinate units in the x direction, 15 in the y direction, and 20 in the z direction.
This DrawContents implementation creates a TLine3D and uses the MGraphic3D. TranslateBy function to move the line 10 world-coordinate units in the x direction, 15 in the y direction, and 20 in the z direction.
Transformation matrix
  void DrawContents( TGrafPort& thePort ) const
  {
      TGrafMatrix3D translateMatrix;
      translateMatrix.TranslateBy( TGPoint3D( 10, 15, 20 ) );

      TFrameBundle3D frameBundle( TRGBColor( 0, 0, 0 ), 5.) );
      TLine3D lineGraphic( TGLine3D( TGPoint3D( 10, -10, 15 ),
                          TGPoint3D( 125, -40, 25 ) );
      lineGraphic.AdoptBundle( new TGrafBundle( frameBundle );
      lineGraphic.Draw( scenePort );

      lineGraphic.TransformBy( translateMatrix );
      lineGraphic.Draw( scenePort);
  }
MGraphic3D transformation functions
  void DrawContents( TGrafPort& thePort ) const
  {
      TFrameBundle3D frameBundle( TRGBColor( 0, 0, 0 ), 5.) );
      TLine3D lineGraphic( TGLine3D( TGPoint3D( 10, -10, 15 ),
                          TGPoint3D( 125, -40, 25 ) );
      lineGraphic.AdoptBundle( new TGrafBundle( frameBundle );
      lineGraphic.Draw( scenePort );

      lineGraphic.TransformBy( TGPoint3D( 10, 15, 20 ) );
      lineGraphic.Draw( scenePort);
  }
Draw a 3-D box with a simple bundle
This DrawContents implementation draws the 3-D wire frame box with a frame that is 2 worldcoordinate units wide shown in Figure 137. TGBox3D has no corresponding MGraphic3D derived class, but can be sent to the drawing port for fast rendering of rectilinear wire frames.

1  void DrawContents( TGrafPort& thePort ) const
2  {
3      TFrameBundle3D( TRGBColor( 0,0,0 ), 2.0 );
4
5      TGBox3D box3D( TGPoint3D( 10, -10, -15 ), TGPoint3D( 150, -40, 25 ) );
6      thePort.Draw( box3D, frameBundle );
7  }

1  void DrawContents( TGrafPort& thePort ) const
2  {
3      TSceneBundle sceneBundle;
4      TPerspectiveCamera* camera = new TPerspectiveCamera();
5      camera->SetProjectionPoint( TGPoint( 0,0 ) );
6      sceneBundle->AdoptCamera( camera );
7      TLinkedScenePort scenePort( &thePort, &sceneBundle );
8
9      TFrameBundle3D frameBundle( TRGBColor( 0,0,0 ), 2.0 );
10
11      TGBox3D box3D( TGPoint3D( 10, -10, -15 ), TGPoint3D( 150, -40, 25 ) );
12      scenePort.Draw( box3D, frameBundle );
13  }
Lines 9 through 12: Create a frame bundle and the box. Draw the frame bundle and box into the scene port.
Using sweeps
The sweep classes let you create shapes such as spheres, cones, tori, and cylinders in a few lines of code. Figure 139 shows the torus created from the DrawContents implementation that follows. The torus has a large radius of 100 worldcoordinate units, and a small radius of 50 world-coordinate units. The large radius is the distance form the origin (which is the center of the torus) to the inner edge of the torus, and the small radius is the distance from the inner edge of the torus to the center of the tube.

  void DrawContents( TGrafPort& thePort ) const
  {
      TTorus3D torus( 100, 25);
      torus.Draw( thePort );
  }

  void DrawContents( TGrafPort& thePort ) const
  {
      TTorus3D torus( 100, 25);
      torus.Draw( thePort );
      torus.TranslateBy( TGPoint3D( 150, 0, 0 ) );
      torus.RotateBy( 50, TGrafMatrix3D::kAboutXAxis );
      torus.Draw( thePort );
  }
1  void DrawContents( TGrafPort& thePort ) const
2  {
3      TPerspectiveCamera* camera = new TPerspectiveCamera();
4      camera->SetPosition( TGPoint3D( -200, 200,1440 ) );
5
6      TSceneBundle* sceneBundle = new TSceneBundle();
7      sceneBundle->AdoptCamera( camera );
8      sceneBundle->SetAmbientLight( TRGBColor( 1, 1, 1 ) );
9      TParallelLight* light = new TParallelLight( TGPoint3D(-1,-1,-1), TRGBColor(1,1,1,));
10      sceneBundle->AdoptLight( light );
11      TLinkedScenePort port( &thePort, sceneBundle );
12
13      TTorus3D torus( 100, 25);
14      torus.Draw( port );
15      torus.TranslateBy( TGPoint3D( 150, 0, 0 ) );
16      torus.RotateBy( 50, TGrafMatrix3D::kAboutXAxis );
17      torus.Draw( port );
18  }
Lines 6 through 11: Create a scene bundle, parallel light, and a linked scene port. The camera is a global attribute so you must create a scene bundle, adopt the perspective camera, set the ambient light, and adopt a parallel light for the tori to look correct. The ambient and parallel lights are white. The TGPoint3D( -1, -1, -1 ) parameter to the parallel light defines the vector to which the light is parallel. When the new scene bundle is passed to the TLinkedScenePort, it overrides the default global settings in the drawing port.
Lines 13 through 17: Create and draw the tori. Use the linked port that you created to draw the tori. This causes the scene bundle with the new camera settings to be concatenated to the default scene bundle.
Camera defines the vantage point from which the 3-D graphics are viewed, light defines which portions of the graphics are illuminated and from what direction, and atmosphere adds a haze or a fog to the scene.
Any 2-D graphics drawn to the same port are not affected by the global attributes. If you drew 2-D graphics into a drawing port with 3-D graphics and moved the camera or changed the lighting or atmosphere effects, only the appearance of the 3-D graphics is affected.
Any 2-D graphic can be converted to a 3-D graphic by passing it to a TGCurve, which in turn, can be passed to a TGCurve3D or TCurve3D. This lets you combine 2-D and 3-D graphics in a view so that all graphics in the scene are affected by the global attributes.
To change any global attribute, you must create a scene bundle and use a TLinkedScenePort instance to concatenate the new scene bundle to the drawing port. The settings in the new scene bundle completely override the default global settings of the drawing port, which means that you may have to specify your lighting and atmosphere settings too. Chapter 17 provides more information on scene bundles, and Chapter 19 provides more information on linked drawing ports.
Graphic attributes define the appearance of the graphic, and global attributes further refine the appearance by changing the vantage point, adjusting the light, and adding atmospheric effects. See Chapter 16 for more information on 3-D attribute bundles.
Global attributes
Camera, light, and atmosphere are global attributes that are defined at the drawing port. They affect all 3-D graphics drawn to a particular drawing port. Graphic attributes
Color, frames, shaders, and texture maps are graphic attributes defined by a 3-D attribute bundle. Shaders compute the effects of light upon the visible surfaces and texture maps add visual interest to a surface by applying various types of textures to the surface. 3-D graphic groups
Because you can convert any 2-D graphic to a 3-D graphic through curves, you can combine 2-D and 3-D graphics into a 3-D group and treat them as a single graphic for transformation operations and hit detection. See Chapter 18 for more information on 3-D graphic groups.
[Contents]
[Previous]
[Next]
![]() Click the icon to mail questions or corrections about this material to Taligent personnel.
Click the icon to mail questions or corrections about this material to Taligent personnel.
Generated with WebMaker